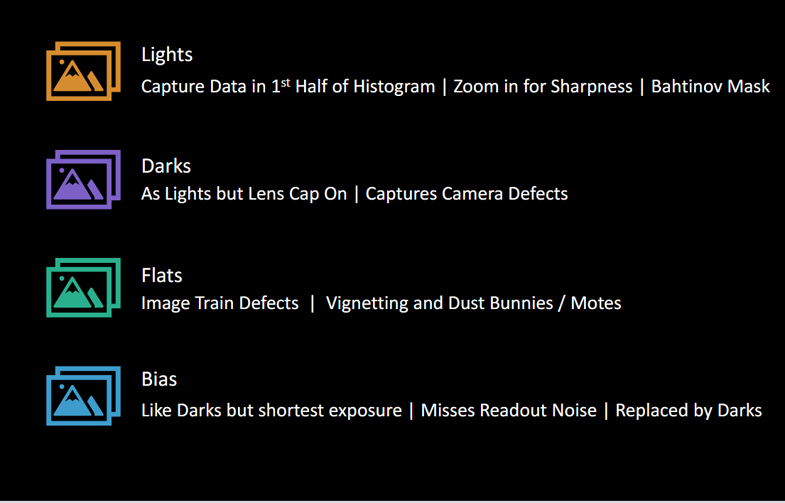
Processing
Astro Images with Affinity Photo
First time setup
In the Window menu on top bar
-> Unselect all menu items except: Histogram,
Layers, Navigator, Info, History
On right bar ->
Drag Info to top section alongside
Histogram
Drag Layers to its own section
on right bar below the Histogram
Section
Drag History to middle section
alongside Layers
Drag Navigator to bottom section
on its own
Switch
to 2x RGB Samplers
In the Info Module -> Highlight
CMYK section then from 3 bar menu
select "Remove Selected Sampler"
In the same Info Module -> from 3 bar menu select "Add
New Sampler"
Open
the Stacked Image
File -> Open -> Select
the newest file in the data directory (use the image with “sr”
in it to use the star reduced version)
Crop
Image
Press c to crop, then drag lines as needed and press enter
to complete
Convert
to 16 bit Image
(Optional but recommended until experienced)
Document -> Convert Format / ICC Profile
-> Select Format: RGB/16 ->
Convert
Remove
Initial Stretching
In Layers module - drag Curves
Adjustment & Levels Adjustment
to Dustbin to delete
Set
Light and Dark Limits
Info module, select first
crosshairs next to A (luminence)
and drag to centre of brightest star
Info module, select second crosshairs
next to A (luminence) and drag to
a very dark area
Initial
Curve Stretch
In Layers Module select Adjustments
icon then Curves
Click in middle of curves line and drag a little up and left - Don't
let the first sample numbers reach 255
Select Merge
Adjust
Image Levels
In Layers Module select Adjustments
icon then Levels
Note the number for the second Sampler window (dark area sampler) (like
32/33/32)
In Levels box, drag Black
Level to halfway to the picture data in histogram
Drag White Level to left until same
numbers for dark area come back - avoid the first sampler numbers nearing
255 if possible
Select Merge
Repeat this step to improve the stretch effect
Create
Differential Stretch (S-curve)
In Layers Module select Adjustments
icon then Curves
If the RGB sampler numbers are at
255 then drag the top right point of the diagonal line a little lower
to reduce to 245
Select Picker to create the S-curve
Choose a very dark area and drag down a little there
Choose a mid brightness area and drag up a little there to form an S
curve
Merge
Repeat this step to improve the stretch effect
Reduce
Noise
Hold down the Ctrl key and use Mouse
scroll wheel to zoom in to about 400%
Drag image to show an area mixed with light and dark parts
Filters -> Noise
-> Denoise
Drag the Luminence and Colours
Sliders to full left
Drag Colours Slider slowly to right
until uniform colours achieved (no green/blues)
Drag Luminence Slider slowly to
right until coarse grain is smoothed out
Apply
Double Left Click mouse on the image
to return to full size image
Adjust
Vibrance
In Layers Module select Adjustments
icon then Vibrance
Drag Vibrance Slider to full right
(100%)
Drag Saturation Slider to right
by 10%
Merge
Final
Curve Stretch
In Layers Module select Adjustments
icon then Curves
Click in middle of curves line and drag a little up and left
Merge
File
-> Save as (saves as AF format)
File -> Export -> JPG/PNG/TIFF
etc
The
above notes are available for download HERE
The imaging software workshop held at Highworth Community Centre - Credit:
Paul Newton-Smith
|