| Part
One - What's a telescope for? A big misconception of many an amateur astronomer, starting out, is that he or she must have a telescope. And to be seen without one at a star party just isn't on! This simply is not true. Some of the best views to be had of the night sky have made use of that superior piece of apparatus, the mark one eye ball! Yes you can enjoy the night sky without any optical aid at all. And just because you are into astronomy does not mean you have to spend a fortune on a telescope. I like to think of astronomy as an activity that evolves, starting with the mark one eye ball. After all no optical aid has such a wide field of view as the eye, that's why you can't use a telescope to view a meteor shower, for example. You sometimes need that really wide field of view. I will explain field of view later on. But where the eye fails is in the collection of faint light. If we take a modest pair of binoculars, for instance, they might have an aperture (size of the lenses at the front) of say 50mm. Your eye may only have an aperture of about 5mm. This is determined by the size of the pupil once your eyes have grown accustomed to the dark. Let me take you back to those boring maths lessons. Because we have increased the aperture, from 5mm to 50 we have increased the light gathering power as well, you might think by something like 10 times? In actual fact its much more than that. Now the maths. The
area of a circle is proportional to the square of the radius multiplied by Pi Dont confuse light gathering power with magnification, I will come to that later. The light gathering power is a measure of much of that valuable light, that has travelled so far across space, is collected. The more light collected the fainter the objects we can see and the further back in time we can see. How mind blowing is that? So you can begin to see why, as an astronomer you might want to use an optical aid. And since I mention binoculars, this is an excellent bit of kit to start with. Binoculars, especially those that can be mounted on a tripod, offer great wide field views of the night sky. The Milky Way, our galaxy, is an awe inspiring view through binoculars on a warm summers evening. Plus the added bonus that they can be used during the day too. How
do binoculars work then? If you think of binoculars as being two telescopes strapped
together, one for each eye, this is basically what they are. In fact binoculars
work along the same lines as the first type of telescope I want to talk about
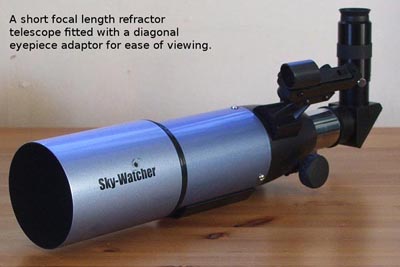
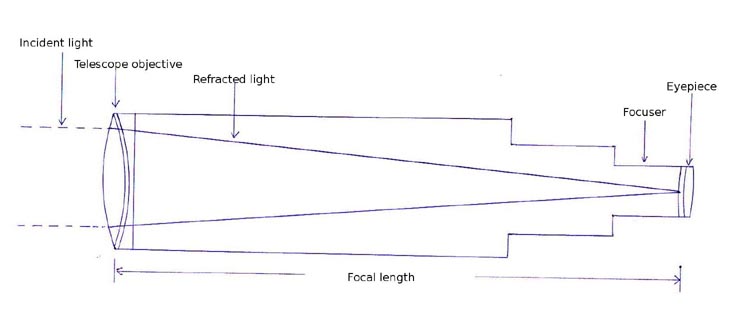
here. Please read on and all will become clear! There are about three main types of telescope. The Refractor. The Reflector or Newtonian. And the Cassegrain or catadioptric telescope. The refractor telescope is what most people think of when you mention the word telescope. It's a hollow tube with a lens at one end and an eyepiece at the other. And basically thats what a refractor is. The lens causes the light rays to bend or refract to a point near the eyepiece. At this point an image is formed which is magnified by the eyepiece. Sounds simple doesn't it? Why can't I just get a bit of drain pipe, borrow Grans magnifying glass and stick that at one end, then get an eyepiece and stick it in the other? Well you could, as long as Granny knows! In fact some years back I tried to build my first telescope like that. Sadly it didn't work very well. This
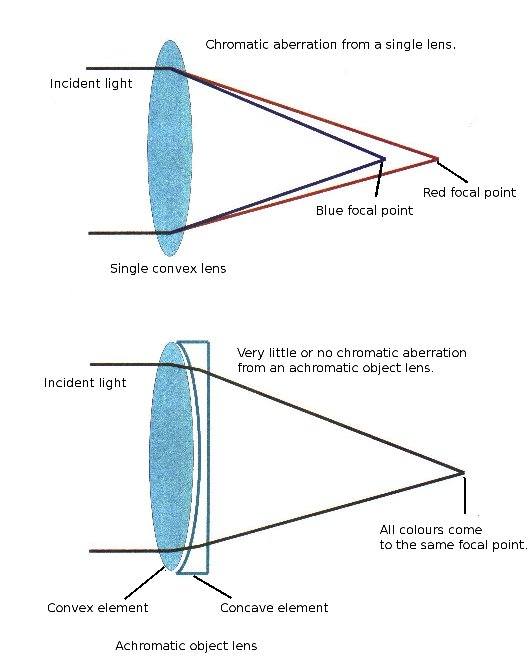
is because a single lens works a bit like a prism. I'm sure you remember, from
school, seeing white light being split into its separate colours by a prism. The
single lens brings the different colours of light to a focus at slightly different
points. Blue light closest to the lens, red light further away. It's acting like
a lens and a prism. This is most undesirable for a telescope. It causes, what
is technically known as, "chromatic aberration" This means that if we
look at say the Moon, we would see different coloured fringes around the edges
of the Moon.
To
overcome this problem we can either make the telescope very long - a very very
long focal length lens suffers only a tiny amount of chromatic aberration. But
this would be quite impractical.
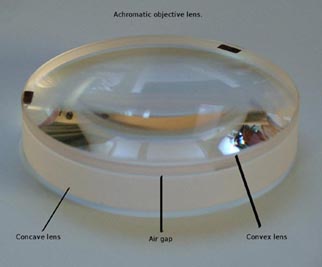
So the two lenses or elements, being of opposite types cancel out each other's undesired effect. This is how modern refractors overcome chromatic aberration or false colours. Some refractor designs use three elements to make up the objective and these are known as "apochromatic lenses" Some
eyepieces are constructed in a similar way. But I wont go into eyepieces too much
here, they deserve an article to themselves.
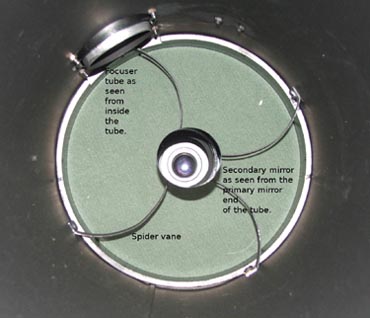
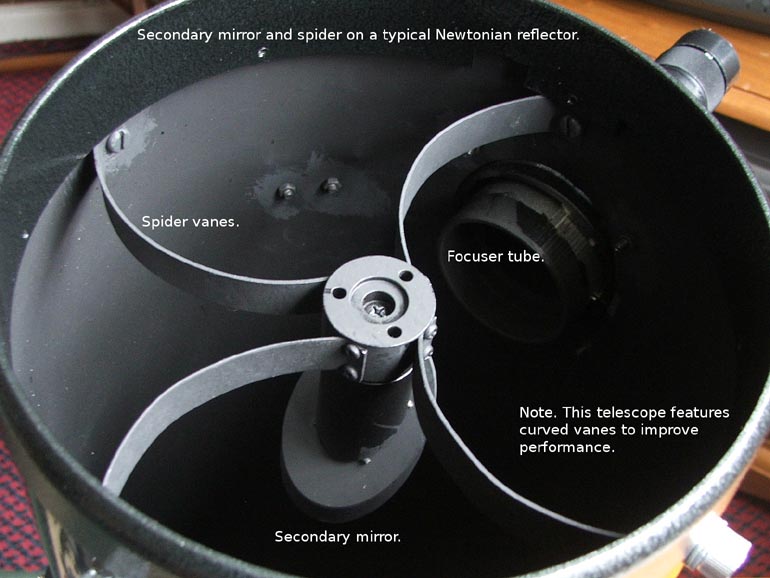
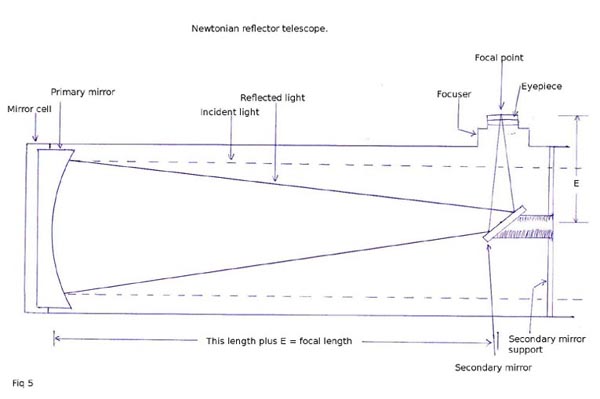
Part Three. The reflecting telescope, the power of the mirror A reflecting telescope makes use of mirrors instead of lenses to gather the light. Just like the refractor, the reflecting telescope has a tube. But this type of telescope has a curved mirror set at the bottom of the tube and a flat mirror set near the top. This flat mirror is angled at about 45 degrees to the curved mirror and is held in place by a "spider". This type of telescope normally has one end of the tube open to the air. The curved mirror is known as the "primary mirror", while the flat mirror is called the "secondary mirror" or "flat". The "spider" consists of three or four metal strips, called vanes, which support the secondary mirror in the centre of the tube. This
type of telescope was first used by Sir Isaac Newton in 1668 and now nearly all
reflecting telescopes are referred to as "Newtonians"
The
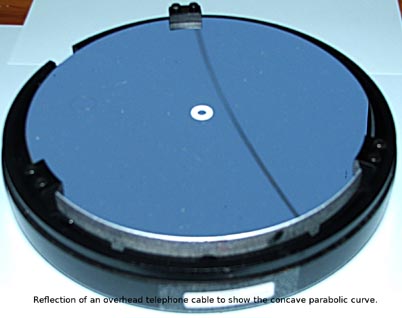
primary mirror of a reflecting telescope has a curved, concave bowl shape to it.
This shape could be described as part of a sphere. This spherical shape is easy
to produce through a process of careful grinding. In the same way that a single
convex lens, in a refracting telescope, would bring light of different colours
to slightly different points of focus, the spherical mirror would suffer a similar
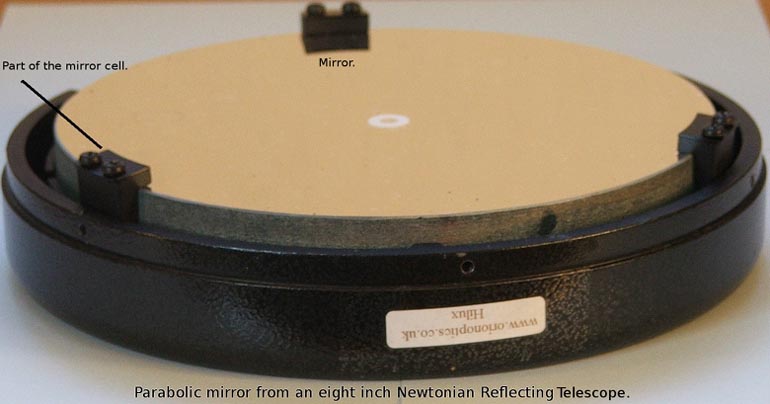
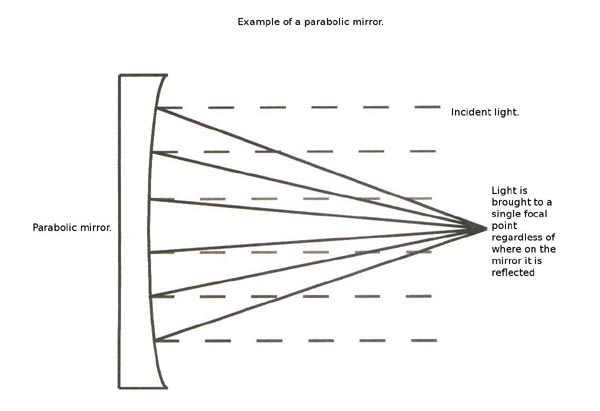
problem. To
cure this problem, when the mirror has been ground to a spherical shape, an extra
grinding process creates a small extra dish shape in the centre of the mirror,
known as a parabola. This parabolic shape somewhat resembles that of a satellite
dish. The result is to now bring the light rays to the same point of focus, regardless
of where the light has landed on the mirrors surface. The result, a telescope
that provides sharp images in the eyepiece.
The
shape or smoothness of the flat or secondary mirror is just as important. It is
thought of by some, that a perfectly flat mirror is harder to produce than a good
parabolic primary mirror. The accuracy of a mirror or how well it has been ground,
is measured in fractions of the wavelength of light. For example, a good telescope
would be expected to have been produced to 1/4 of the wavelength of light. To
put that measurement into perspective consider this. The thickness of a human
hair is about 0.7mm. Visible light has a wavelength of around 0.0005mm. Imagine
a fraction of this! But it is obtainable and even budget telescopes almost reach
this figure.
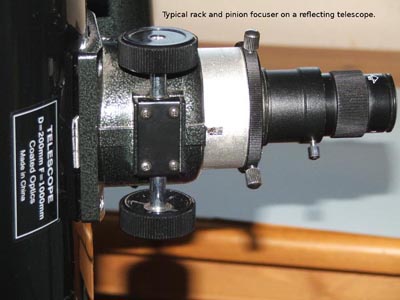
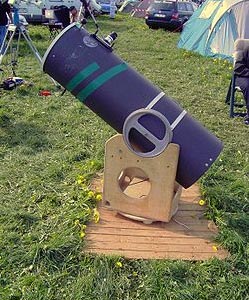
There are various versions of the Newtonian reflector. Some are called "Dobsonians", this simply refers to the type of mount onto which the telescope is fixed. The Dobsonian mount is named after its inventor and is a simple altitude and azimuth mount. The larger reflectors may also have dispensed with a tube altogether. These scopes may use a series of rods or poles to support the flat mirror and focuser section, while the primary mirror is housed in a separate section that supports the rods and sits on a base plate. The focuser of a reflector works in the same way as the focuser on refractors. It's designed to support an eyepiece and has a mechanism to move the eyepiece back and forth to focus the telescope.
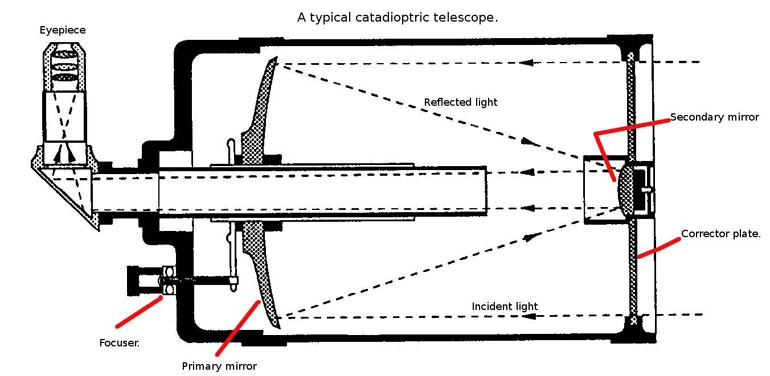
Part Four. The catadioptric or Cassegrain telescope. Lenses and mirrors working in harmony. Well we have covered the refracting telescope, binoculars and the reflecting telescope. Now let's move onto the most complicated telescope of the three. Catadioptric telescopes make use of the best of both the refractor and reflecting telescopes. They use a combination of mirrors and a corrector plate lens to provide a physically short tube, but with a much longer focal length. The two most popular types of telescope to come under this category are the "Schmidt Cassegrain" and the "Maksutov Cassegrain" To understand how this somewhat curious design works, it is easier, for the time being, to think of them as a short Newtonian reflector with a type of lens placed across the front of the tube. Also for now I will refer to both types as CATs. Not to confuse this CAT with the furry variety. The CAT has a tube with a primary mirror at the bottom, just as the reflector and a secondary mirror near the top of the tube. The big difference being the secondary mirror. You will hopefully remember from the reflector that we sometimes refered to the secondary mirror as the flat. However with this design of scope the secondary mirror is not flat at all. It has a convex shape, not unlike a lens, but it is a mirror. The primary mirror has the same type of parabolic shape as the Newtonian but with a much deeper dish. This gives the mirror a much shorter focal length. Light enters and travels down the tube until it encounters the primary mirror. It is then reflected back up the tube where it meets the secondary mirror. The light is then reflected back down the tube again, only this time the rays have been focused into a cone shape and through a hole in the centre of the primary mirror. Here they pass into the focuser and eyepiece at the rear of the scope. The
curved secondary mirror is held in place by a glass plate that fits right over
the aperture of the tube. This plate also has a distinct shape to it and is known
as the corrector plate. Although a CAT is a very clever design, the very short
focal length primary mirror, that it uses, causes some problems. For a start the
mirror may suffer from some spherical aberration, because the parabolic shape
lies mostly in the centre of the mirror, right where there is a hole.
Some designs do not use a parabolic mirror at all. Instead they use a spherical mirror and rely on some divergence of the light rays caused by the corrector plate. This provides the same results as a parabolic mirror. Very short focal length mirrors can also suffer from a problem known as "coma". This can be seen as giving stars an almost comet look about them when they are close to the edge of the field of view. The corrector plate is shaped to provide the same aberrations as the mirror, but in reverse. And just as the the refractor's objective lens uses two (or more) elements, to cancel out each others aberrations, the corrector plate does the same for the primary mirror. In the case of the Schmidt Cassegrain this corrector plate may appear to be flat, but it will have been figured. The convex shape of the secondary mirror causes the light rays to spread somewhat as they travel back down the tube. This has the effect folding the light path and visually extending the length. Although the physical length of the telescope seems quite short. It is not unusual for a CAT to have a focal length that is more than three times its physical length. This makes the telescope much lighter and considerably more compact than both the refractor and the reflector. The main difference between the Schmidt Cassegrain telescope and the Maksutov Cassegrain telescope is in the shape of the corrector plate. The Maksutov has a corrector plate with a much deeper dish shape to it. The Maksutov corrector plate is said to have a meniscus contour. One important point to remember about a CAT telescope is they tend to dispense with a focuser, in the normal sense. A CAT telescope instead features a mechanism that moves the primary mirror to focus the telescope. This has pros and cons, but allows the telescope to achieve a much broader focusing range to accommodate many different devices, cameras ect.
Part
Five. Magnification (or how the telescope makes things appear larger) Its worth remembering that the magnification of a telescope or binoculars is only one consideration and, in my opinion, by and far the least important factor. So beware! Nevertheless, this is how magnification is obtained by a telescope. The thing to remember is that the telescope itself does not actually magnify. In general the telescope is designed to gather light and the eyepiece magnifies the image produced by the telescope. But certain parameters of the telescope will affect the magnification that the eyepiece can provide. Basically the longer the focal length of the telescope, the higher the magnification a certain eyepiece will provide. For example, if your telescope has a focal length of 500mm and you use a 10mm focal length eyepiece, this set-up will provide 50 times magnification. To work it out we need to go back to the maths lesson! Magnification
equals focal length of the telescope If however, we have a longer focal length telescope, the magnification will be higher for the same eyepiece. The same formula still applies though. The amount of magnification you may need will depend upon what celestial object you are interested in viewing. Basically if your interest is "deep sky objects", then a long focal length eyepiece, providing low magnification will provide the best results. However if you want to view the planets, then you will need a short focal length eyepiece to provide a high magnification. For example, with our telescope of 500mm focal length we want to view Jupiter. We would need to use something like a 5mm focal length eyepiece, to obtain 100 times magnification. But if we wanted to view the Pleiades star cluster with our telescope, we would need to use something like a 20mm focal length eyepiece, to obtain only 25 times magnification. So as a rule of thumb, high magnification for viewing the planets and low magnification for viewing deep sky objects such as star clusters and galaxies.
Part
Six. Field of view (FOV). How much can I see? The field of view is mostly governed by the size and type of eyepiece. But the aperture of the telescope will also play a small part. Generally a larger aperture telescope will give a larger field of view. To calculate the field of view or FOV we must first know the FOV of the eyepiece we are using. This information is normally supplied with the eyepiece, along with its focal length and is given in degrees. For this exercise I will assume your eyepiece has a quoted FOV of 50 degrees and a focal length of 25mm. FOV
= magnification of telescope and eyepiece set-up For example our 500mm focal length telescope when used with a 25mm eyepiece, will provide a magnification of 20 times. The eyepiece has a quoted field of view (FOV) of 50 degrees. So that is 20 divided by 50 which gives us a FOV of 0.4 of a degree. This means our telescope when used with this eyepiece will let us view about half of a degree of the night sky. That is about as much sky as is occupied by the full Moon. So the Moon would just about fill the whole of the view through this 25mm eyepiece.
Part seven. The mount. What the telescope sits on.
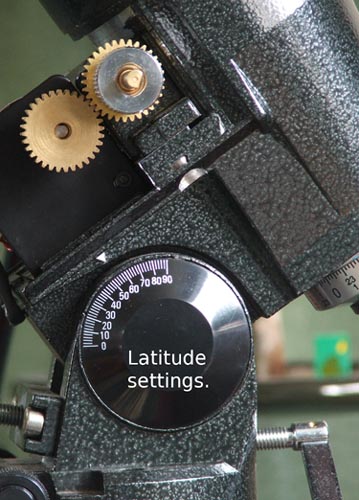
If you have paid attention to the night sky you will have noticed that the stars, Moon, Sun and the other objects move across the sky. For us here in the northern hemisphere they travel from east to west. This movement is due to the rotation of the Earth, we are standing on a rotating platform. If we could draw lines across the sky that show the track objects follow, we would see arcs across the sky. The equatorial mount is designed so that one of its bearings or axes accurately follows these arcs. The axis of the mount that follows this track is called the "right ascension bearing" and must aligned so that it is angled, to the horizontal, by the same amount as the observer's latitude on Earth. The other axis of the mount is known as the "declination bearing". This bearing is at right angles to the right ascension bearing, so the mount looks like the letter "T", but tilted over.
If we are using a telescope or binoculars the movement of these objects across the sky is magnified quite a lot. To keep the telescope concentrated on one object, using either a Dobsonian mount or the Alt Azimuth mount, we would require the observer to move both axes' at the same time. This can prove quite awkward, especially if the object is something you want to study or photograph, say one of the planets. Because
the equatorial mount has one axis that tracks the paths objects follow across
the sky, it is only necessary to move this one axis. With this type of mount it
is quite simple to install a motor that causes the telescope to move, slowly but
in sync with the movement of the objects in the sky (by objects I mean celestial
objects, not man made).
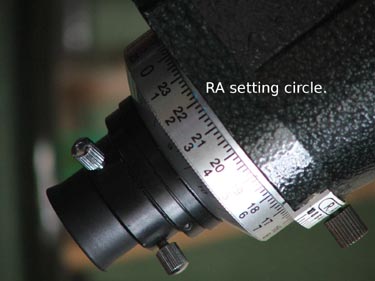
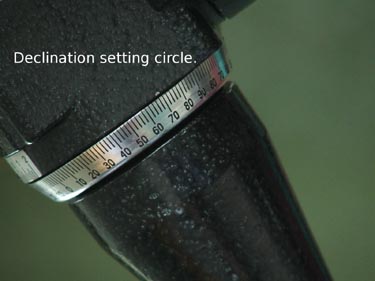
Equatorial mounts also allow the user to make use of setting circles on the mount. These setting circles, once set up, will allow the astronomer to quickly find objects using coordinates given in books and magazines. Their use takes practice and is beyond the scope of this article.
Good luck with your hobby and clear skies! | ||||||||||||||||||||||||||||||